Description:
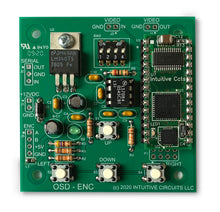
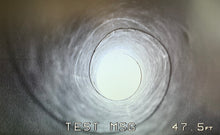
OSD-ENC is an on-screen composite video overlay device that overlays external encoder distance information onto any incoming NTSC or PAL composite video source such as a color video camera. In addition to displaying encoder distance information, OSD-ENC can also display a user defined message. OSD-ENC is compatible with 2 channel quadrature encoders with up to 600 pulses per revolution.
Specifications:
| Dimensions: |
2.5" L x 2.5” W x .7" H |
| Weight: | 1.0 oz. |
| RoHS compliant: | Yes |
| Input voltage: | 7.0 to 14.0 volts DC (150 ma max.) |
| Operating temperature: |
-40C to +85C (extended temperature range standard) |
| Video format: | Composite video |
| Video level: | 1 volt peak to peak |
| Video impedance: | Input 75 ohm, output 75 ohm resistively terminated |
| Encoder compatibility: | 2 channel quadrature encoders with up to 600 pulses per revolution |
| User custom message length: | 8 characters |
Connecting Solder Pads:
Solder Pads: +12VDC (J1)| Pad | Description |
| +12VDC | 7.0 to 14.0 volts DC input |
| GND | Ground |
Solder Pads: SERIAL (J2)
| Pad | Description |
| OUT |
OSD-ENC serial output (for PC hookup attach to female DB-9 pin 2) |
| GND | Ground (for PC hookup attach to female DB-9 pin 5) |
| IN | OSD-ENC serial input (for PC hookup attach to female DB-9 pin 3) |
Solder Pads: VIDEO IN (J3)
| Pad | Description |
| VIDEO IN |
Video Input |
| GND | Ground |
| Pad | Description |
| VIDEO OUT |
Video Output |
| GND | Ground |
Solder Pads: ENC (J5)
| Pad | Description |
| A |
Encoder A channel |
| B |
Encoder B channel |
| +5 |
Encoder +5 VDC input |
| GND | Encoder Ground |
Solder Pads: Buttons (P1)
P1 solder pad block is wired in parallel with the MENU, UP, DOWN, and ENTER buttons
O O O O <- UP, LEFT, DOWN, RIGHT
[O] O O O <- Ground Pads
Pull the UP, LEFT, DOWN, or RIGHT pad to ground to generate the button press
DIP Switch Configurations:
| DIP # | Description |
| 1 | Reserved |
| 2 |
Reserved |
| 3 |
NTSC or PAL video format OFF = NTSC (default) ON = PAL |
| 4 | Firmware flash update OFF = Normal operation ON = Firmware flash mode |
Note: DIP switch inputs are only checked during power-up.
On-Screen Menu Configuration:
At any time press the "DOWN" button to enter the on-screen menu configuration. The "UP”, “DOWN”, and “RIGHT" buttons move the cursor and change the settings. All configuration information is stored in non-volatile memory so information is retained even with loss of power to OSD-ENC.
Main Menu:
| Menu Option | Menu Option |
| Overlay | ON - Display the overlay text OFF - Pass video through without displaying the overlay text |
| Display Menu... | Display the On-screen Display Menu |
| Encoder Settings... | Display the Encoder Settings Menu |
| Save Changes and Exit | Save changes and exit the Main Menu |
| Discard Changes and Exit | Discard changes and exit the Main Menu |
Display Menu
| Menu Option | Action / Setting |
| Distance Units | Distance units format · RAW (encoder pulses) · FEET · METER |
| Horz Justify | Distance units horizontal screen justify · LEFT · CENTER · RIGHT |
| Vert Justify | Distance units vertical screen justify · TOP · CENTER · BOTTOM |
| Show User Msg | ON - Display the user defined message on-screen OFF - Do not display the user defined message on-screen |
| User Msg * | Enter an optional 8 character on-screen message UP / DOWN buttons to cycle through characters RIGHT button to advanced cursor to next position |
| Horz Justify | User message horizontal screen justify · LEFT · CENTER · RIGHT |
| Vert Justify | User message vertical screen justify · TOP · CENTER · BOTTOM |
| Adjust Screen Position | Adjust the on-screen text position |
| Main Menu | Return to Main Menu |
| Menu Option | Description |
| Pulses Per Rotation * | Encoder pulses per rotation (e.g. 600) |
| Inches Per Rotation * |
Encoder inches per rotation (e.g. 141.50)
|
| Allow Neg Distance | ON - Allow negative distance to display on-screen OFF - Do not allow negative distance to display on-screen |
* Note: Data can be also entered via serial RS-232 port (9600, n, 8, 1).
Operation:
After power is applied OSD-ENC displays the current encoder distance with optional user message.
At any time press the "UP” button to reset the counter
At any time press the "DOWN" button to enter the on-screen menu configuration
Trouble Shooting Tips:
| Problem | Solution |
| Green Power LED will not illuminate |
Verify power supply output (7.0 to 14 volts DC) |
| OSD-ENC will not turn on | Verify polarity of supply to OSD-ENC |
| On-screen text is difficult to read |
Verify that the OSD-ENC “VIDEO IN” has a noise free video signal
|


