Description:
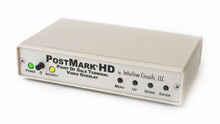
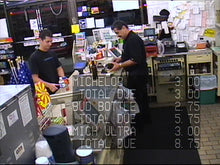
Businesses lose millions of dollars each year from illegal Point of Sale (POS) activities by their employees. Unauthorized discounts, “sweethearting”, voids, and substitute scanning are just a few of the many cashier fraud techniques that are difficult to detect from just reviewing the security camera video.PostMark® HD is a standalone on-screen HD video overlay device that interfaces most major Cash Registers and Point of Sale Terminals (POS) with AHD, HD-TVI, and HD-CVI (720p / 1080p) security video cameras allowing suspicious cashier transactions to be captured.
Who can benefit using PostMark® HD:
| Business Type | Examples of Benefits |
| Bars | Captures a bartender ringing up a Coke and pouring an expensive alcoholic drink instead. |
| Department/ Electronics Stores | Captures “sweethearting” where an accomplice brings expensive items to the checkout but the clerk does not ring them all up. Captures substitute scanning where the clerk fixes a barcode of a lower value item on their watch and when an item from the accomplice is scanned the temporary barcode is read instead of the actual item (but the transaction looks correct on camera). |
| Convenience Stores / Gas Stations | Cash based transactions occur more often with businesses that sell alcohol, cigarettes, gasoline, etc. Captures “no rings” where a clerk just opens the cash register drawer (to potentially steal cash) when no transactions have occurred. PostMark® HD recognizes the open drawer and displays the exception on-screen. |
| Grocery Stores | Captures theft from clerks in grocery stores who may attempt coupon fraud, “sweethearting”, and “short changing.” Short changing occurs when a clerk is actually cheating the customer by giving incorrect change. For example the customer purchases items for $14, gives the clerk $20, and only get $4 back. The clerk takes $2 out of register later. |
| Fast Food Restaurants | Fast food restaurants are often cash based transactions with clerks sharing the same cash register. Captures the clerk “short ringing” or giving away additional food for free to friends. Short ringing occurs when a clerk rings up the amount for an item at a higher price than the real price and takes the extra money from the cash register. The clerk may not complete the sale until the customer has left in case the customer requests a receipt or challenges the price. In this case the clerk can cancel the entry and ring up the correct price. |
PostMark® HD also supports other applications such as tollbooths, ATMs, cash counting machines, stationary vehicle radar signs, weight scales, and more.
Specifications:
| Dimensions: | 5 1/2" x 3 1/2" x 1 1/4" |
| Weight: | 9.6 oz. |
| RoHS compliant: | Yes |
| Input voltage: | 8.0 to 14.0 volts DC (150 ma max.) |
| DC plug: | 2.1 mm x 5.5 mm, center tip positive |
| Operating temperature: | -20C to +60C |
| Video formats: | AHD, HD-TVI, HD-CVI (720P and 1080P) |
| Video level: | 1 volt peak to peak |
| Video impedance: | Input 75 ohm, output 75 ohm resistively terminated |
| RS-232 serial input: |
|
Connections:
PostMark® HD has five connectors
| Connector | Hookup |
| VIDEO IN | · Attach noise free AHD, HD-TVI, or HD-CVI (720P and 1080P) video source |
| VIDEO OUT | · Attach to HD video monitor, DVR, video transmitter, etc. |
| SERIAL IN | · Attach to POS Terminal or Cash Register RS-232 serial output port using the supplied cable |
| SERIAL OUT | · Optional RS-232 serial pass-through (e.g. attach to a pole display RS-232 input port) |
| DC IN | · +8.0 to +14 volts VDC · 2.1 mm x 5.5 mm DC coax plug, center tip positive |
DIP Switch and Jumper Configurations:
PostMark® HD has 8 internal DIP switches and 14 internal jumpers. The DIP switch settings and jumper positions do not need to be adjusted normally. To access the DIP switches and jumpers disconnect all cables from the PostMark® HD unit then remove the 2 screws from the rear of the enclosure. The rear panel and bezel with the circuit board will slide out.
DIP Switch Configurations:
Note: DIP switches are only checked during power-up.
| DIP # | Description |
| 1 - 6 | Reserved |
| 7 |
Factory Reset OFF = Normal operation ON = Factory Reset |
| 8 | Firmware flash update OFF = Normal operation ON = Firmware flash mode |
Jumper Configurations:
The PostMark® HD RS-232 serial port must be configured to match the electrical configuration (pin out) of the Cash Register or Point of Sale Terminal. This is accomplished by installing jumpers on the 2x14 jumper pins just below the DB-9 RS-232 serial connectors.
| Jumper(s) | Description |
| P5, P9, P4, P8, P3, P7, P2, P6, P1 | These jumpers tie the SERIAL IN pins to the SERIAL OUT pins. The Cash Register / PC connector pins tied to the printer / pole display connector pins allows the register / POS Terminal RS-232 signals to pass-through to the printer or pole display. |
| TX, RX, GND | These jumpers tie the SERIAL IN (TX, RX, and GND) pins to PostMark® HD circuit board. |
| CTS | This jumper ties the SERIAL IN (RTS) and (CTS) pins together. This may be required for some cash registers. |
| DCE | This jumper ties the SERIAL IN (DCE) and (DTE) pins together. This may be required for some cash registers. |
Operation:
- Apply power to the PostMark® HD
- During power-up the yellow “Activity” LED will blink for 10 seconds
- The yellow “Activity” LED illuminates and on-screen text is displayed when valid Cash Register or POS Terminal data is received
- Press the “MENU” button to enter the on-screen menu configuration (see below)
- Simultaneous press the “UP/DOWN” buttons to configure the incoming video input source (see below)
Configuring the incoming video source:
- The PostMark® HD unit must be configured to match the incoming video input source AHD, HD-TVI, or HD-CVI (720p or 1080p)
- To match the incoming video input source press and release the “UP/DOWN” buttons simultaneously to cycle through the video options until stable text is visible on-screen (you will see an on-screen menu)
- Press and release the “ENTER” button once
- Wait for the on-screen PostMark® HD restart message to appear
- The configuration information is stored in non-volatile memory so information is retained even with loss of power to PostMark® HD
On-Screen Menu Configuration:
At any time press the “MENU” button to enter the on-screen menu configuration. The “UP”, “DOWN”, and “ENTER” buttons move the cursor and change the settings. All configuration information is stored in non-volatile memory so information is retained even with loss of power to PostMark® HD.
Main Menu:
| Menu Option | Action / Setting |
| Enable Overlay | OFF = Display the overlay textON = Pass video through without displaying the overlay text |
| Display Options Menu... | Display the Options Menu |
| Cash Register and POS Settings... | Display the Cash Register and POS Terminal Settings Menu |
| Save Changes and Exit | Save changes and exit the Main Menu |
| Discard Changes and Exit | Discard changes and exit the Main Menu |
Display Options Menu:
| Menu Option | Action / Setting |
| Horz Position | On-Screen Cash Register / POS Terminal text frame horizontal position · Left - Display frame on the left side of the screen · Center - Display frame in the center of the screen · Right - Display frame on the right side of the screen |
| Vert Position | On-Screen Cash Register / POS Terminal text frame vertical position · Top - Display frame on the top of the screen · Center - Display frame in the center of the screen · Bottom - Display frame on the bottom of the screen |
| Frame Width | Cash Register / POS Terminal text frame width (16 - 40) |
| Frame Height | Cash Register / POS Terminal text frame height (02 - 10) |
| Frame Border | OFF = Do not display a frame border ON = Display a frame border |
| Hide Text When Inactive | OFF = Do not hide Cash Register / POS Terminal text ON = Hide Cash Register / POS Terminal text after a specified time (see below) |
| Min - Sec -- | Time to wait to hide Cash Register / POS Terminal text if no activity(0 - 9 minutes) and (00 - 59 second) |
| Main Menu | Return to Main Menu |
Cash Register and POS Terminal Settings Menu:
| Menu Option | Action / Setting |
| Baud Rate | Cash Register / POS Terminal baud rate (4,800 - 38,400) |
| Model | Cash Register / POS Terminal model |
| Custom Register/POS Settings... | Custom Register/POS Terminal Settings MenuSettings used when Model (above) is set to “Custom” |
| Diagnostics... | Display RS-232 diagnostics screen |
| Main Menu | Return to Main Menu |
Custom Cash Register and POS Terminal Settings Menu:
| Menu Option | Action / Setting |
| Total Rows | Range: (1-4) Default: 1 |
| Total Columns | Range: (16-40) Default: 40 |
| Num Action Items | Range: (01-10) Default: 01 |
| Action Item List | Each Byte Range: (01-10) Default: 06 |
| Num Header Bytes | Range: (0-5) Default: 0 |
| Header Bytes | Each Byte Range: (00-FF) Hex |
| Num Footer Bytes | Range: (0-5) Default: 0 |
| Footer Bytes | Each Byte Range: (00-FF) Hex |
| Num Bytes To Ignore | Range: (00-40) Default: 00 |
| Ignore Non-ASCII | OFF = Do not ignore non-ASCII text (Default) ON = Ignore non-ASCII text |
| Allow EOL Timeout | OFF = Do not allow EOL timeout (Default) ON = Allow EOL timeout |
| Reset To Defaults | Reset custom Cash Register and POS Terminal settings to default values |
| Main Menu | Return to Main Menu |


